Call us: 612-919-4414
Garage Floor Coating
Before and Afters, Garage Floor Coatings

The Ultra Top Coat for Garage Floor Coatings

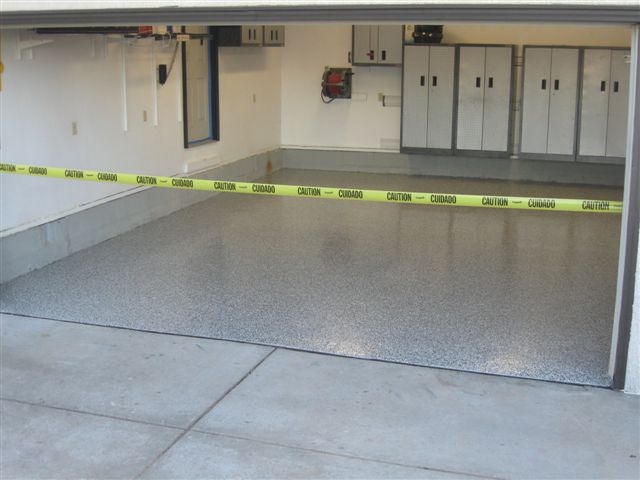
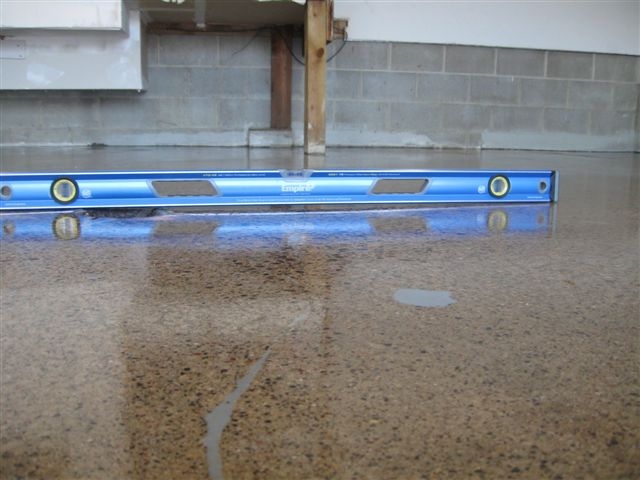
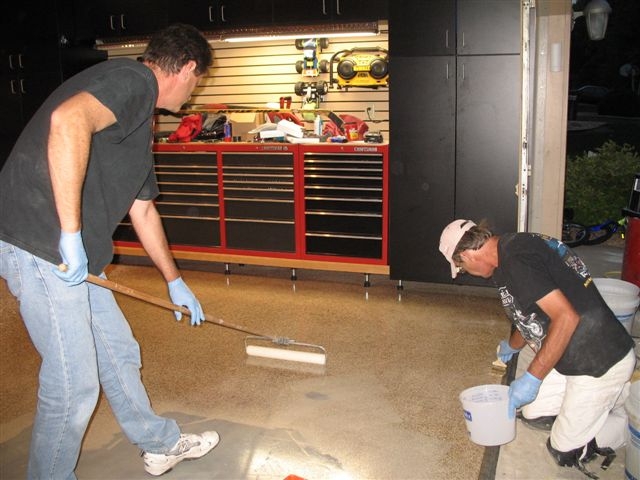
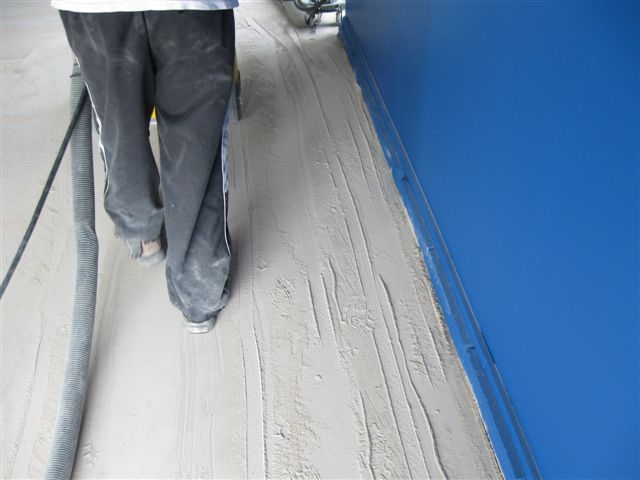
Question: How thick is your garage floor top coat? We hear this question all the time.

Answer: Every coating manufacture and blender has a recommendation for the thickness of the coating wear surface or D-F-T (Dried Film Thickness). This recommendation is  minimal at best and is based on keeping the cost down for the applicator/contractor.  We, at G-F One Coatings, know it’s simply not enough.

apply garage floor coating apply garage floor coating

Result: We only apply, for our Minneapolis, Minnesota area customers, a top coat that has a D-F-T that is twice, 2 times or 100% MORE than the manufacture’s recommendation.

Garage Floor Finish Garage Floor Finish

Conclusion: We add more value to our customer’s garage floor project by increasing the thickness of the top coat. Our customers can see the difference. Over time, we hear comments about their appreciation for the “rich, deep, thick top coat” and it’s long term performance.

garage floor coating Garage Floor Coating

So we, at G-F One Coatings,  named our top coat “the ULTRA TOP COAT.”  It’s on every garage floor we do. Call us anytime at 612.919.4414

garage pop-out
Concrete Preparation, Garage Floor Coatings

What is a “Pop-out” in your Garage Floor?

By definition a “pop-out,” in concrete, is the breaking away of the concrete surface leaving a “shallow, conical, depression in the surface.”  In Minnesota, it’s usually caused by freeze / thaw cycles, aggregate expansion (a stone in the concrete slab that may be close to the surface), and/or the constant salt attack  (think DOT: winter road salts).

garage pop-outconcrete pop-out

Scenario: The typical home owner is naturally concerned about these “pop-outs” in their concrete. They attract dirt, moisture, water, and every year they progressively worsen. Eventually, the owner goes to a store and buys  repair material, such as caulk or bagged cement, with the anticipation of it working.

Question: Should you apply a garage coating over a repaired “pop-out?”

Answer: No. The repairs must be removed and replaced. Once a coating is applied, the concrete slab will equalize with moisture (RH – Relative humidity). Moisture over time will deteriorate the “do-it-yourself” repair at the bond point and “pop-out” again.

jack hammer concretejackhammer concrete

Question: How should they be repaired and what is the cost?

Answer: All of our repairs are based off industry standards, recommendations, processes and procedures – in layman’s terms, we jackhammer all the damage and repairs out, and fill them with material that is guaranteed to perform and last.  The cost can vary based on damage from nothing to $100’s – pending on how much labor and material is required to bring the surface to our standards prior to coating. Every floor is different.

filling concrete cracks filled pop-outs

Conclusion: If the old repairs are left in, and the contractor coats over the repair, the failure (which is inevitable) is now the responsibility of the home owner – therefore nullifying any warranty the coating has.

At G-F One Coatings we remove ALL previous repairs, whether they are poured repairs, cement repairs, or caulked (do-it-yourself repairs).

Through years of experience, we have found that if our processes and procedures for repairing “pop-outs” are not properly executed, the failure factor will come to play and the floor will not last.  By not following these guidelines, the garage floor coating is simply put at risk.

Feel free to contact us at 612.919.4414

G-F One Truck and Trailer
Before and Afters, Concrete Preparation, Garage Floor Coatings

Epoxy Floors, Failure and Removal

In the past few years, we’ve experienced a sharp increase in the demand to remove failed epoxy garage floors in the metro area.  After asking each and every one of our customers about why their previous floor failed – we got a variety of responses.  Some of the floors lasted years, some of them months and some of them just days.  Some of them blamed their applicators, some of them blamed the product. Some of them even blamed the neighbor who told them to do it in the first place. Regardless of who did it, or why it happen, one thing was clear – each epoxy floor had separated from the garage surface. The coating simply delaminated from the concrete.

epoxy floor failure epoxy floor failure

On a positive note:  each of the customers found value in having a garage coating. They appreciated the decorative  colors that matched their houses or garage interior. They liked the way their vehicles looked parked on the floor. They appreciated the overall “neat / clean” look of the garage. They even noticed that they were less likely to fall on the floor due to the increased slip-resistance of the coating.

grind concrete floor grind concrete floor

To avoid the failure factor – the formula is simple – the “Prep Perfect System,” polyurea / polyaspartic, and an experienced applicator.

Here are some of our finished floors – that are guaranteed to work long-term.

garage floor coating garage floor coating

Questions? Comments? Feel free to give us a call at 612.919.4414

level on concrete
Before and Afters, Concrete Preparation, Garage Floor Coatings

Floor Drains and Minnesota Garage Floor Coatings

The History: This home was built in the early 90’s in an upscale development in Woodbury Minnesota. The garage floor was installed with a center floor drain. A handy and useful feature in any garage. Especially in Minnesota, where snow melts from vehicles in the winter.

The Challenge: However, in this case, the drain simply didn’t work. The reason being, the drain was set too high in the floor, which caused a large ponding area around the drain.

level on concrete level on concrete

To show this, we placed a level between the drain and the surrounding floor.  Surprisingly, this challenge is not that uncommon.

The Solution: The “old school” solution is to build up concrete or repair material around the floor drain so that water flows correctly.   We’ve seen this attempted numerous times – generally, this solution is short-lived. Often times, the fill will delaminate due to moisture building up around the drain. Add in freeze / thaw cycles and road salts – delamination is inevitable.

Our solution: instead of adding concrete around the drain, we create drain paths. By cutting notches in the cast iron drain bowl, and drainage paths in the surrounding concrete, our solution allows water to easily flow into the drain. Simple. Furthermore, we give our customers a surface that is easily cleanable, and with a soft double headed foam squeegee the customer can move water and debris to the drain in minutes. Leaving the surface bone-dry and ready for use.

garage floor drain garage floor drain

To prove that our thought-process and solution worked. We returned days later and flooded the floor with 10 gallons of water and gave our customer a squeegee and asked him politely to clean his floor.  And as you can see from the pictures, it worked perfectly. The floor drain that was unusable for the last 15 years now worked as it should.

squeegee garage floor squeegee garage floor

Our customer’s comment: “It works!”

finished garage floor coating finished garage floor coating

Comments? Questions? Call us at 612.919.4414

garage floor coating
Before and Afters, Garage Floor Coatings

Joe’s Garage: A Unique Example of a Garage Done Right

Here’s the story: A pending kitchen remodel in 2003, forced us to move our kitchen temporarily into the garage. We built out the East Wall with a “pizza kitchen” with cabinets, refrigerator,  microwave and sink. We also didn’t forget the stereo and TV.  After eating our meals in the garage for so long (the kitchen remodel was  a long process), we eventually coined the phrase “Garage Food.”

garage cabinets garage kitchen

With winter fast approaching, we realized that in order to eat comfortably, we needed heat and ventilation.  We installed patio doors for natural light along the North Wall and insulated the remaining walls.

garage patio doors garage patio doors

With winter departing, still eating “garage food,” (the kitchen remodel had already been completed) the boat and four wheelers needed maintenance, along with the sleds in order to put them away for the season.  So we installed a wall of shop cabinets and tool boxes (the tool crib) on the last remaining wall.

garage toolbox garage graphic inlay

Then came the one thing that we at G-F One Coatings specialize in and will always have a passion for – garage floors. After some deliberation and planning, I had graphic inlays printed – a company logo, and a Dale Earnhardt Jr.  race car.  We prepped the concrete floor with “The Prep Perfect System” and then applied our polyurea/aspartic elastomeric full-chip, granite look (color: saddle tan)  garage floor. Here are some of the pictures of the results.

garage floor coating apply garage floor coating

What started out to be a place to eat, evolved into a garage restoration gone wild. Today, the primary use of the garage isn’t for parking cars.  It’s my office, which allows me more time at home with my family. It’s our computer room, it’s where we catch Sunday’s big game, it’s where the family gatherings are held. In the winter, it becomes a game-room for the kids.

garage floor coating garage graphic inlay
Throughout the whole process, I could have never foreseen what this garage would end up being. And everyday, our customers echo similar sentiments.  To me, the term “garage” no longer is just a  place to park cars.  On special occasions we still serve “garage food.”

Questions? Comments? Call us at 612.919.4414

Concrete Preparation

Installing Garage Floor Coatings with the “Prep Perfect System”

It’s been said: Preparation is 50% of the job. We, at G-F One Coatings, believe when it comes to long lasting Garage Floor Coatings, it’s 100% of the job – so came the phrase, “The Prep Perfect System.” This system was developed by G-F One Coatings and was specifically designed with industry specifications, proven processes, or as we call it – Facts, not opinion. The coating industry has many governing organizations and guidelines for procedures and processes in the preparation of concrete for a coating system. Using all these guidelines and perfecting these procedures, we can install garage floors that are built to last, with guaranteed results.

grinding concrete for garage coatings grinding concrete for garage coatings

By the end of 2005, after considerable research and development, we had a long series of processes all based on completeing a coating project in one day. By the end of 2006, the coating technology – fast-cure polyureas – became common in the industry.  With the “Prep Perfect System” and this new concrete coating technology, we had completed our two year quest to develop and perfect a one day installation.

grinding concrete for garage coatings grinding concrete for garage coatings

The first national publication for polyurea coating, was released in October of 2006. It was written by Joe Nasvik and featured in Concrete Construction Magazine. A quote from the article, “Joe Sheehan, owner of Garage Floors 1, Oakdale, Minnesota, an application contractor, says he’s developed a system for preparing slabs by diamond grinding with a dry vacuum pick-up to achieve an 80 grit profile. “I know that my preparation is good when the primary coat absorbs completely into the surface.”

Questions about the “Prep Perfect System?” Call us at 612.919.4414

Concrete Crack Fill
Concrete Crack Repair, Concrete Preparation

Repairing Concrete Cracks in Minnesota

When it comes to prepping a concrete floor for polyurea/aspartic coatings, properly filling cracks and saw-cuts is critical to the long-term success of the flooring system.  Improperly filled cracks, either with poor process or product, is a recipe for failure.

Concrete Crack Fill

Cracks are challenging for a number of reasons. The first reason, is cracks are vents for moisture release from the slab. They also collect moisture, debris and may expand as concrete freezes and thaws – especially areas, such as Minneapolis, where the seasons change so drastically. All of these factors make concrete crack repair challenging.

So how do you repair concrete cracks?
After extensive testing, of all the existing products and processes, we have found a method with proven, long-term results. It comes down to two things; the process and the product.

The Process
First, all cracks must be jackhammered open (or chased).  This opens the crack and creates fresh concrete for guaranteed adhesion with our crack filler. This also removes weak spots or soft spots in the path of the cracks in the concrete.  Once the cracks have been opened, they are cleaned and vacuumed out to remove dirt and debris.

Crack Chasing with Jackhammer Clean Concrete Crack

The Product
Next, we mix a two part polyurea quick cure crack material. It is then poured / filled into the crack creating a vertical fill. You can see this in top-most picture.  We fill the crack so that it is level with top of the concrete floor surface and let it cure.

Filling Concrete Cracks Filled Concrete Cracks

Once the crack-material is cured, we grind off the excese material and grind the surface so that it is uniform and smooth. It’s now ready for our pure polyurea/aspartic elastomeric coating system.

Grinding Concrete Crack Fill Grinding Concrete Crack Fill

Contact G-F One Coatings for more information or call us at 612.919.4414

Garage Cleaning Supplies
Garage Coating Maintenance

How to Clean a G-F One Garage Floor Coating

One of the biggest wants / needs we hear from our customers is this, “I want a Garage Floor that’s easy to clean. How easy is your garage coating to clean, and how do I do it?” Here’s the answer to all of those questions.

Firstly, all floors get dirty. Due to water, dirt, debris from outside and from the vehicles that are parked on it, it’s inevitable that your floor will get dirty – with or without a garage floor coating. However, our coating is extremely easy to clean. Unlike concrete, which soaks up moisture and retains dirt, our garage floor coating is waterproof and stain resistant, allowing for quick and easy clean-up.  In a few quick steps, you can have your floor looking like it was put down that day.

Garage Cleaning Supplies

Here’s what you need.

1. Five gallon bucket
2. Clear ammonia
3. Soft-bristle push broom
4. Soft dual-head floor squeegee
5. Joy – for cleaning grease spots
6. Warm Water
7. Wet / Dry Shop Vac

Step 1 – Clean all grease, oil and/or dark stains – Pour warm water into the bucket.  Pour the water onto the affected areas and apply a few drops of Joy onto the surface. Use a small hand brush to clean the surface and wipe clean after. DO NOT USE TOO MUCH SOAP – too much ends up creating a thin film build that will make your floor look hazy or cloudy and also makes it  slippery when wet. It doesn’t hurt the floor, but it does create a safety hazard and makes it difficult to clean up since soap attracts dirt. Our advice – just don’t do it!

Garage Spot Cleaner Spot Cleaning

Step 2 –  Add 10% ammonia to warm water / Agitate With Broom  – Pour out the water with ammonia evenly over the garage floor.  Then take the soft bristle push broom and scrub and agitate the dirt. This mobilize the dirt into the water.

Pouring Ammonia Pour Water onto Garage Floor

Step 3 – Squeegee the water out of the garage – Next, take the foam squeegee and pull toward the garage door. Be sure to rinse off driveway with a garden to prevent dirt / debris build up. In the winter pull it to one area and pick up the water with a Wet / Dry Shop Vac.

Broom water off Garage Floor Squeegee Garage Floor

And just like that, your floor is restored to it’s original (clean) condition.  We recommend that you clean it or broom it off as often as possible (weekly). Dirt and debris create extra abrasion which can cause premature wear on a floor – depending on the amount of traffic it sees.

Clean Garage Floor Coating Clean Garage Floor Coating

See G-F One Coatings for more information or call us at 612.919.4414

Removing Linoleum off Concrete
Before and Afters, Concrete Crack Repair, Concrete Preparation, Garage Floor Coatings, Spancrete / Weatherproofing

Case Study: One Rough piece of Spancrete in Minneapolis

Here’s one for the record books.

This case study was designed to show you how we seal and coat a spancrete. Below are some pictures of the job.

History: The home was built in Roseville Minnesota in the late 60’s on a lake.  Underneathe the spancrete garage they had built a theater and exercise room.  Soon after they had completed the new rooms, the spancrete had begun to leak – causing considerable damage to the new investment.

The leaking had started in the late 80’s. At that time, there were no coating technologies available to correct the problem. The only solution at the time was to caulk shut all the cracks. After that, the coated the floor with a heavy layer of epoxy and glued directly to the epoxy “old-school,” heavy duty linoleum sheets. It lasted 20 years.

Challenges: The first step would be to remove the existing linoleum, epoxy and caulk. After which, the concrete had to be ground smooth.  Once the material had been removed and the concrete ground, we then had to identify and repair any existing cracks.

Removing Linoleum off Concrete

Solution: The solution was to fill all the cracks with a flexible, “membrane-like,” vertical crack filler.  Once the cracks had been filled and ground smooth, we had to apply our polyurea/aspartic, elastomeric coating system.

Conclusion: Harsh Minnesota winters and freeze / thaw cycles can wreak havoc on garage floors – including spancrete.  Since spancrete tends to flex and move more than conventional garage floor, the choice of the coatings is absolutely critical to it’s longevity.  G-F One Coatings has specialized in repairing, waterproofing and coating spancrete garage floor since 2005. See GFOneCoatings.com for more information or call us at 612.919.4414

Spancrete / Weatherproofing

How Spancrete is Constructed – Why it Matters for Garage Coatings

Spancrete floors are common in Minnesota homes. They offer a great way to create additional living space at a low cost to the home-owner.  The concept of spancrete is straightforward, however, older installations have considerable challenges, such as leaking and/or deterioration of the garage floor surface. This article is designed to give you a better understanding of how spancrete is constructed and how G-F One Coatings is able to permanently repair failing spancrete garage floors.

Step 1. Footings are poured and Walls are placed

Foundation Walls

Step 2. Spancrete planks are placed horitzontally across foundation walls

Placing Spancrete

Step 3. Spancrete waterproof membrane is installed (newer installations)

Spancrete Membrane

Step 4. Concrete is placed over spancrete planks and membrane

Pouring Concrete onto Spancrete

Step 5. Concrete is hand trawled or power trawled

Concrete Surface Finishing

Our Minnesota environment is devastating to a garage floor surface – especially spancrete. Freeze / thaw cycles, road salts, and constant moisture from snow melting and wet vehicles begin to break down and deteriorate the surface causing cracking, spalling and pop-outs.

G-F One Coatings specializes in repairing and protecting your spancrete garage floor. We do this by diamond grinding off the damaged surface, repairing all cracks and flaws and installing a pure polyurea/aspartic elastomeric (flexible) waterproofing surface membrane. We even offer highly decorative finishes. All backed by a long-term, no delamination warranty.

Visit GFOneCoatings.com for more information or call us at 612.919.4414

1 2
Privacy Settings
We use cookies to enhance your experience while using our website. If you are using our Services via a browser you can restrict, block or remove cookies through your web browser settings. We also use content and scripts from third parties that may use tracking technologies. You can selectively provide your consent below to allow such third party embeds. For complete information about the cookies we use, data we collect and how we process them, please check our Privacy Policy
Youtube
Consent to display content from - Youtube
Vimeo
Consent to display content from - Vimeo
Google Maps
Consent to display content from - Google
Spotify
Consent to display content from - Spotify
Sound Cloud
Consent to display content from - Sound